 Paper Coach
How to Draw a Sun
An easy step-by-step drawing for kids and beginners: 6 steps, about 2 minutes, on paper.

Quick answer
Draw a sun in 6 steps: draw the left side, draw the right side, draw the top and bottom rays, then carry on one line at a time and color it in. It takes about 2 minutes with a pencil or a pen.
- Steps: 6
- Time: about 2 minutes
- You need: paper, a pencil or a pen, something to color with
- From: the Sky & Weather path in Paper Coach
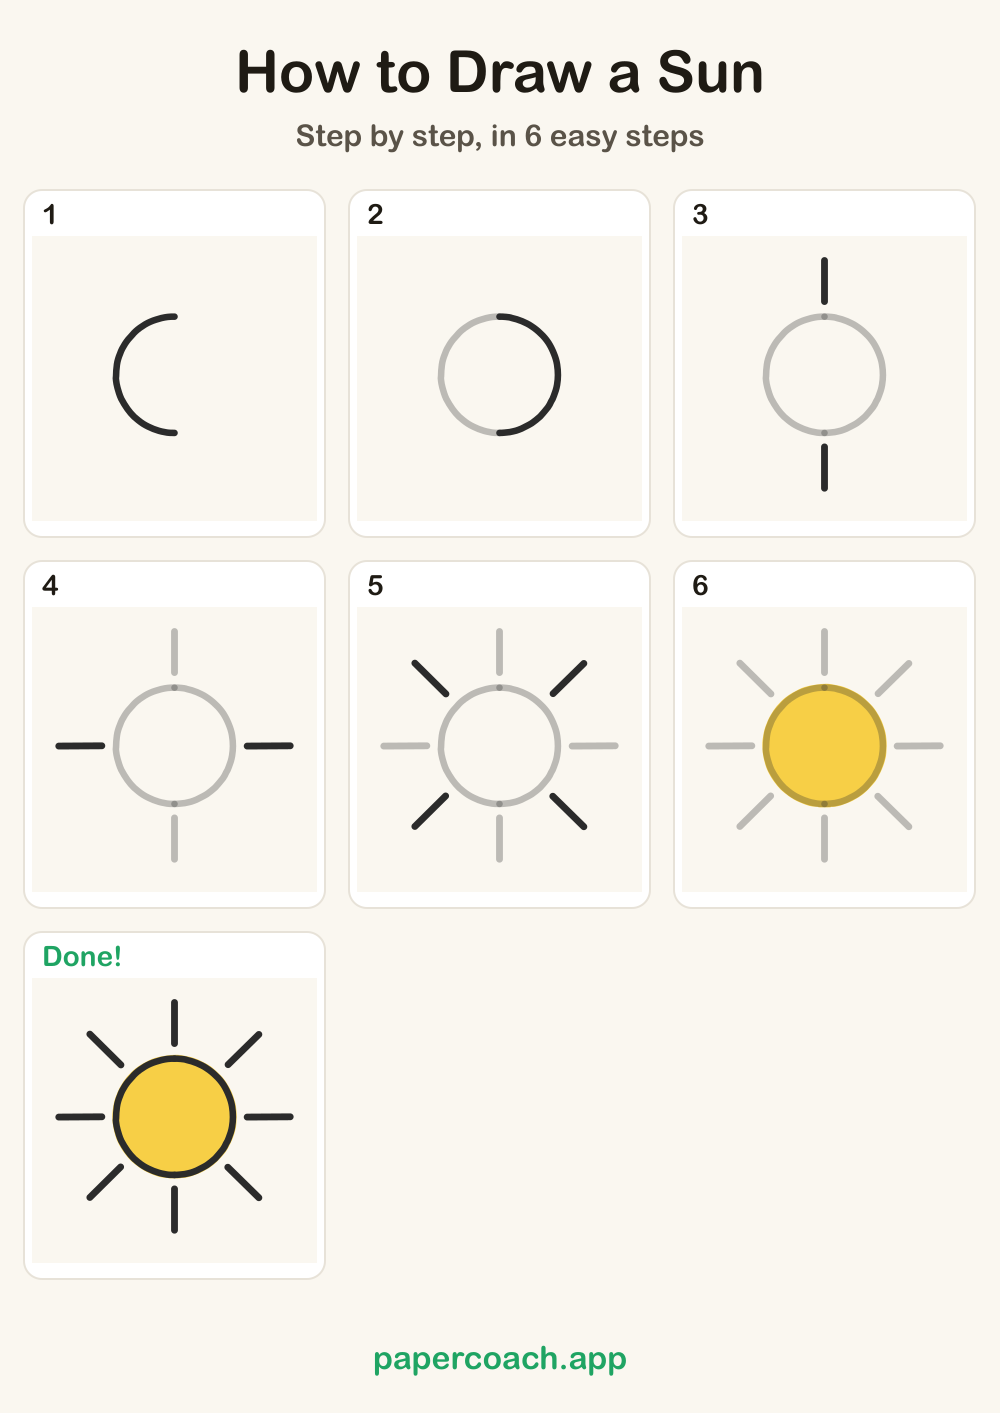
This sun is one big circle with eight short rays around it, like the spokes of a wheel. You draw the circle in two halves, then add rays in pairs so they stay evenly spaced. It's a good first drawing because it uses only a curve and straight lines.
Step by step
Each picture shows the lines so far: the faded ones are done, the dark ones are this step’s.
Step 1: Draw the left side

The sun is a big circle. From the top, curve around the left side down to the bottom.
Step 2: Draw the right side

Now close the circle. From the top again, curve around the right side.
Step 3: Draw the top and bottom rays

Rays are short straight lines. Draw one above the sun and one below, not touching it.
Step 4: Draw the side rays

Next, one ray on the left and one on the right.
Step 5: Draw the slanted rays

Four more rays fit in the gaps, slanting out like an X.
Step 6: Color the sun

Color the sun yellow.
Tips for drawing a sun
- Make the circle large, about half the width of your paper, so there is room left on every side for the rays.
- Start both halves of the circle at the same top point. Then the two curves meet cleanly at the bottom.
- Leave a small gap between each ray and the circle, about the width of a fingertip, all the way around.
- Keep all eight rays about the same length. A good length is about a quarter of the circle's width.
- Aim each ray straight out from the center of the circle, as if it kept going from the middle.
Common mistakes
- The two halves of the circle don't meet, so the bottom has a gap or a point. Draw slowly near the bottom and watch where the first curve ended. Bring the second curve right to it.
- The slanted rays bunch up near the top and bottom rays. Put each slanted ray halfway between its neighbors, so the gaps on both sides look the same.
- Coloring outside the circle and over the rays. Color the edge first with a slow line just inside the circle, then fill the middle.
Make it your own
- Make the rays longer, so they reach about as far as the circle is wide, for a sun that looks extra bright.
- Draw the sun small in a top corner of the page, the way it often sits in a sky picture.
- Try sixteen rays instead of eight by adding one more in each gap.
Your finished sun
Color it in as you like: the colors here are only a start.
All the steps on one page
Save it, pin it or print it, and draw from the paper.
More to draw
 How to Draw a Rocket
 How to Draw a Sailboat
Questions
Why are the rays not touching the circle?
The small gap keeps the circle's round edge clear and makes the rays look like light shining out. If a ray touches, the sun can look like a flower or a wheel.
How do I draw a rounder circle?
Move your whole arm, not just your fingers, and draw in two halves. Light, slow lines are easier to fix. If one side bulges, go over it gently.
How many rays should a sun have?
Eight is easy to space: top, bottom, left, right, then four slanted ones in the gaps. Any number works if the spaces between them look even.
How do I get the slanted rays even?
Picture a big X across the sun. Each slanted ray sits on one arm of the X, halfway between a straight ray and the next.
How long does it take to draw a sun?
About 2 minutes for the lines, and a few more to color it in.
Can kids follow this guide?
Yes, children from about six can follow it on their own, and younger ones with a grown-up beside them.
What do I need?
Paper and a pencil or a pen, and crayons, markers or colored pencils for the colors. An eraser helps but isn’t needed.
Updated 2026-10-23